
1. Project Overview
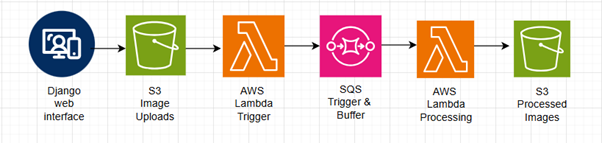
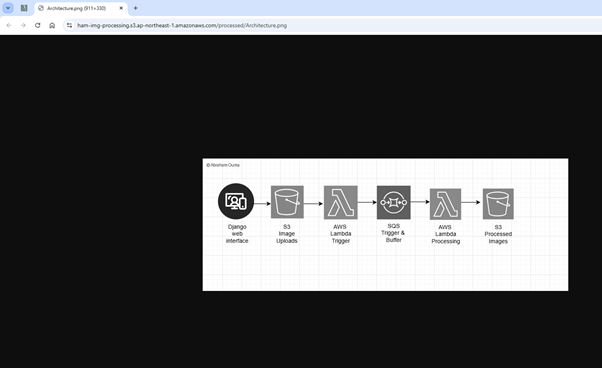
A serverless image processing pipeline where users upload images via a Django web interface. Images are processed by AWS Lambda (adds a grayscale filter and a watermark) and stored back in S3. The system uses S3 events, SQS, and two Lambda functions to decouple upload from processing.
2. Architecture Diagram
3. Tech Stack
- Frontend/UI: HTML + JS in Django
- Backend: Django
- Cloud Services:
- AWS S3 (for file storage)
- AWS Lambda (2 functions)
- AWS SQS (as a processing buffer)
- Libraries: boto3, Pillow, io, JSON
4. Workflow Breakdown
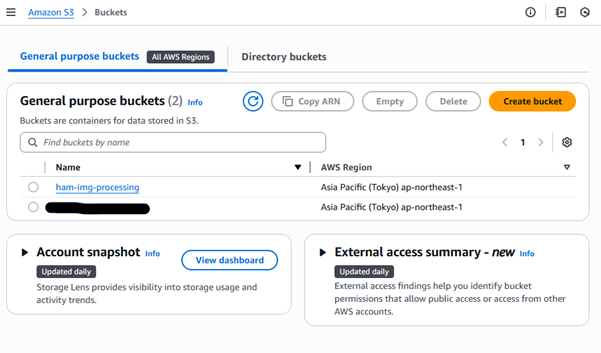
Step 1: S3 Buckets Setup
Purpose:
Amazon S3 (Simple Storage Service) is used to store both the original uploaded images and the processed output. I organized files into two folders within the bucket:
- uploads/ – for raw images uploaded directly from the Django frontend.
- processed/ – for images that have been processed (grayscaled and watermarked) by the second Lambda function.
Bucket Details:
- Bucket Name: ham-img-processing
- Region: ap-northeast-1
Folder Structure:

Permissions:
To support direct uploads from the frontend and reads/writes by Lambda, I used bucket policies and IAM roles.
Bucket Policy (for Lambda access)
This policy was attached to the Lambda execution role to allow the processed images to be accessible to the users:

CORS Configuration (for browser uploads)
To allow the Django frontend to upload images directly via presigned URLs, I configured CORS like this: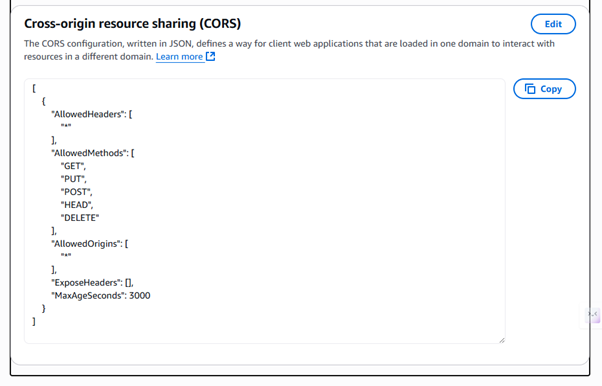
Outcome of the step:
- The frontend securely uploads user images to uploads/ folder via presigned PUT URLs.
- Lambda2 reads from uploads/ and writes processed versions to processed/.
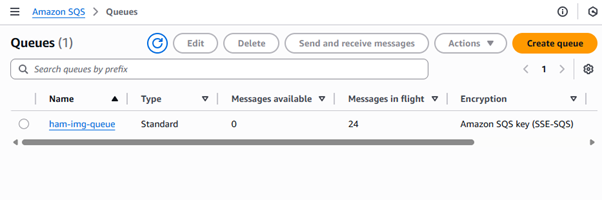
Step 2: SQS (Simple Queue Service)
Purpose:
Amazon SQS acts as a decoupling mechanism between:
- Lambda 1: Triggered when a new file is uploaded to S3 (uploads/ folder).
- Lambda 2: Responsible for processing the image (grayscale + watermark).
This queue ensures:
- Reliable delivery of image processing requests
- Asynchronous execution (upload ≠ processing)
- Flexibility to scale independently allowing multiple processing workers.
Queue Details:
- Queue Name: ham-img-queue
- Type: Standard SQS Queue
- Region: ap-northeast-1
Message Structure:
Every message sent by Lambda 1 to the queue is a JSON object:
{
"bucket": "ham-img-processing",
"key": "uploads/filename.jpg"
}
Step 3: Lambda 1 - Triggered by S3 Upload to Send Message to SQS
Purpose:
Lambda 1 is triggered whenever a new image is uploaded to the uploads/ folder in my S3 bucket.
Its only job is to send a message to the SQS queue (ham-img-queue) that contains the S3 bucket name and key (file path).
This decouples the upload from the processing logic.
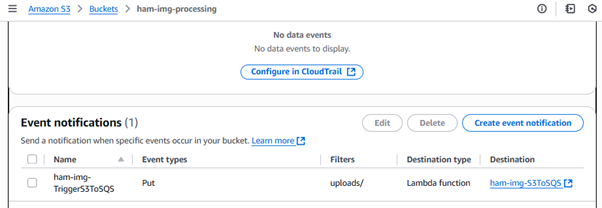
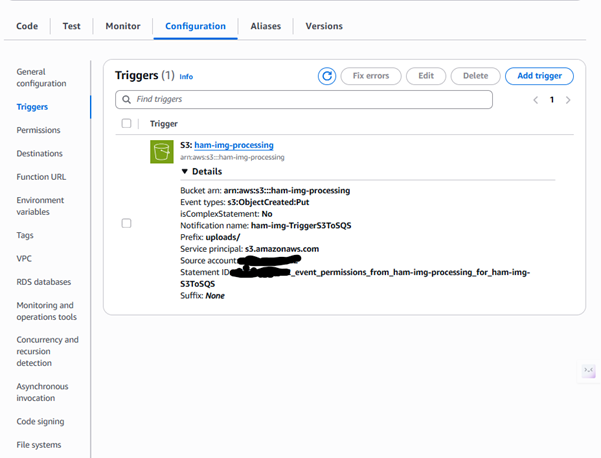
S3 Trigger Configuration:
- Event Source: S3 Bucket - ham-img-processing
- Event Type: PUT Object Created
- Prefix: uploads/
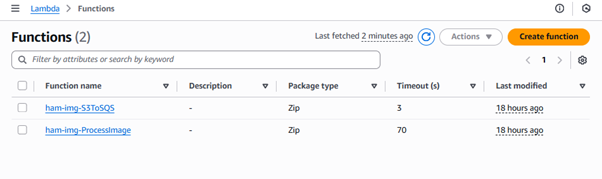
(ensures only files uploaded to this folder trigger the function) - Function Name: ham-img-S3ToSQS
- Runtime: Python 3.10
- Architecture: x86_64
Lambda 1:
Author from scratch:
Here's the full Lambda 1 function:
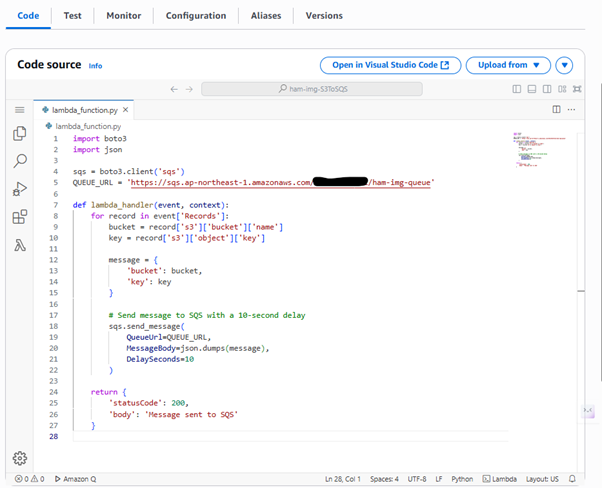
Why the 10s delay:
- When a file is uploaded to S3 via a presigned URL, there's a very short delay (especially over the internet) before the object is fully available to other AWS services like Lambda. If Lambda tries to access the object immediately upon receiving the SQS message, it might not find it causing NoSuchKey errors.
Lambda 1 Trigger:
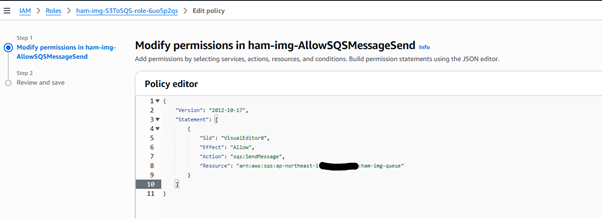
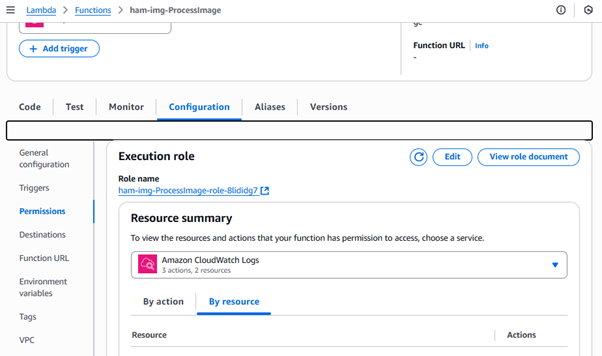
IAM Permissions (Lambda 1 Execution Role):
Still under the function Configuration, Permissions:

Clicked the Role name to add inline policy
Lambda 1 requires permissions to send messages to the SQS queue
Step 4: Lambda 2 - Process Image and Upload to Processed Folder
Purpose:
Lambda 2 listens to the SQS queue (ham-img-queue) and is triggered when a new message arrives. It does the following:
- Downloads the uploaded image from the uploads/ folder in S3.
- Converts it to grayscale.
- Adds a watermark (© Abraham Ouma) at the top-left.
- Uploads the processed image to the processed/ folder in the same S3 bucket.
This is the image processing engine.
Lambda 2 Code:

import boto3
from PIL import Image, ImageDraw
import io
import json
import time
import botocore.exceptions

s3 = boto3.client('s3')

def lambda_handler(event, context):
    for record in event['Records']:
        body = json.loads(record['body'])
        bucket = body['bucket']
        key = body['key']
        filename = key.split('/')[-1]

        print(f"Received bucket: {bucket}, key: {key}")

        # Retry mechanism for get_object
        max_retries = 5
        delay_secs = 1
        for attempt in range(max_retries):
            try:
                obj = s3.get_object(Bucket=bucket, Key=key)
                break
            except botocore.exceptions.ClientError as e:
                if e.response['Error']['Code'] == 'NoSuchKey':
                    print(f"Key not found, attempt {attempt+1}/{max_retries}")
                    time.sleep(delay_secs)
                else:
                    raise  # re-raise other errors
        else:
            raise Exception(f"File {key} not found after {max_retries} retries.")

        image_bytes = obj['Body'].read()

        # Convert to grayscale + watermark
        image = Image.open(io.BytesIO(image_bytes)).convert('L')
        draw = ImageDraw.Draw(image)
        draw.text((10, 10), "© Abraham Ouma", fill=50)

        buffer = io.BytesIO()
        image.save(buffer, format="JPEG")
        buffer.seek(0)

        s3.put_object(
            Bucket=bucket,
            Key=f"processed/{filename}",
            Body=buffer,
            ContentType='image/jpeg'
        )

    return {
        'statusCode': 200,
        'body': 'Image processed and uploaded'
    }
For the script to work, I had to use a Lambda Layer
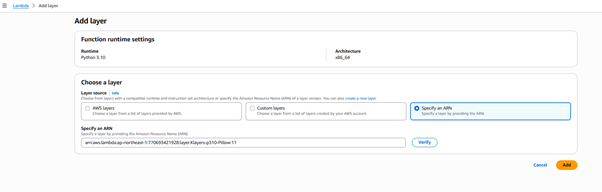
Dependency Management -Using Prebuilt Lambda Layer
The image processing script in Lambda 2 uses the Pillow library, which is not included in AWS Lambda by default. To avoid bundling and uploading my own dependencies, I leveraged a prebuilt public Lambda layer provided by Klayers — a trusted resource for Python libraries compiled for AWS Lambda.
Use Prebuilt Klayers Layer
Layer ARN used:
arn:aws:lambda:ap-northeast-1:770693421928:layer:klayers-p310-Pillow:11
Why I Skipped Manual Zipping of PIL and the .py file locally:
- Building and zipping Pillow locally proved challenging due to OS/library mismatches
- Avoided wasting time troubleshooting library import errors
Under General configuration, I set the timeout to 70 seconds
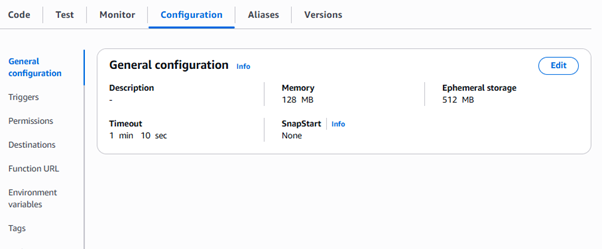
Why the 70s timeout?
- AWS Lambda functions, by default, may time out early (e.g., at 3 or 15 seconds if not explicitly set). Image processing (with retry delays + PIL rendering + S3 upload) may take several seconds, especially for larger files or slow I/O.
Solution:
- Setting the Lambda timeout to 70 seconds ensures Lambda can:
- Wait for S3 availability
- Process the image
- Upload to processed/ folder without risk of premature timeout
Add a trigger
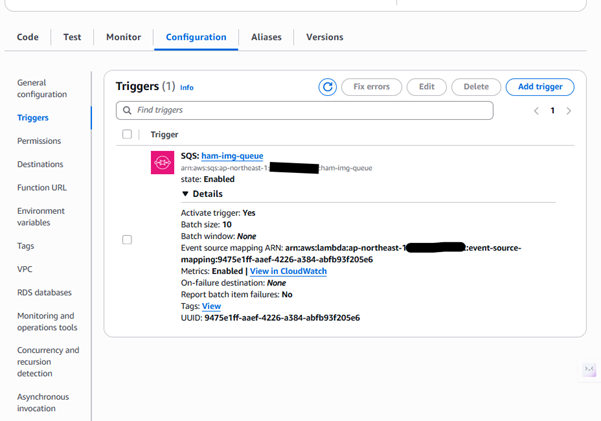
IAM Permissions (Lambda 2 Execution Role):
Lambda 2 needs 2 sets of inline policies, one for SQS and another for S3:
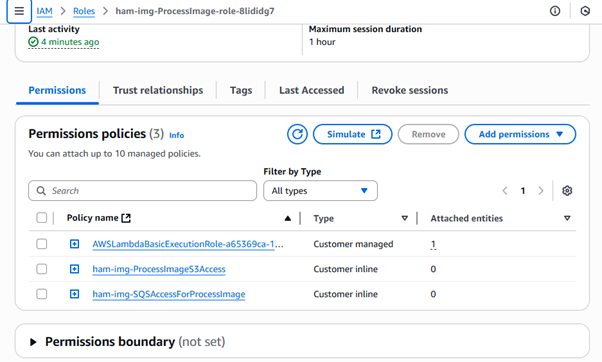
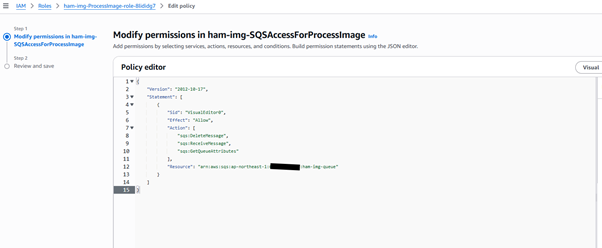
SQS Permissions:
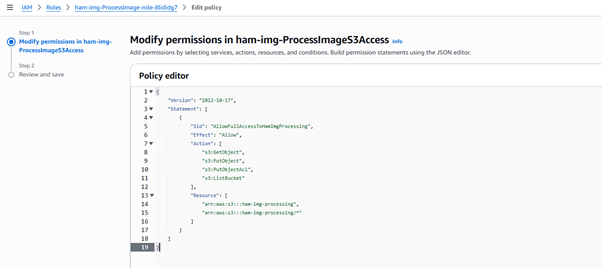
S3 Permissions:
Outcome of step 4:
- A message from SQS triggers Lambda 2.
- Lambda 2 downloads the image, processes it, uploads to processed/.
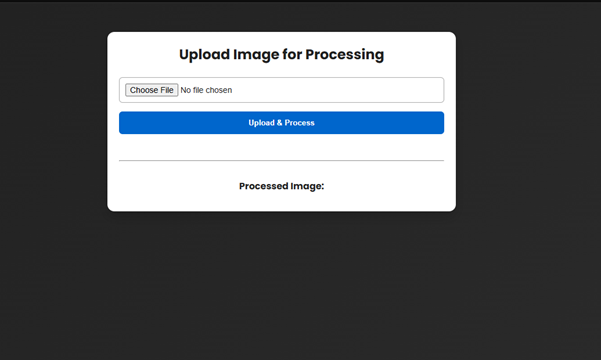
Step 5: Django Integration - Upload UI, Presigned URL, and Image Display
Purpose
The Django frontend enables users to:
- Select an image.
- Upload it directly to S3 using a presigned PUT URL.
- View the processed (grayscale + watermark) version after ~10 seconds.
Django Project Structure
The Django project was already in place, so this image processing feature was integrated non-invasively into the existing structure. A single app handled everything related to file upload, URL generation, and the frontend.
Key additions included:
- A new HTML template with a file upload form and JavaScript to handle direct S3 uploads and processed image display
- Two view functions:
- upload_page: Renders the upload UI
- get_presigned_url: Returns a presigned URL for direct upload to S3
- URL routes added for both endpoints
URL Configuration
# main/urls.py
from django.urls import path
from . import views

urlpatterns = [
    path('get-upload-url/', views.get_presigned_url, name='get_upload_url'),
    path('upload/', views.upload_page, name='upload_page'),
]
views.py
# core/views.py
import boto3
from django.http import JsonResponse
from django.shortcuts import render
from django.views.decorators.csrf import csrf_exempt

AWS_REGION = 'ap-northeast-1'
BUCKET_NAME = 'ham-img-processing'

# Page to render the upload UI
def upload_page(request):
    return render(request, 'core/fileupload.html', {
        'bucket': BUCKET_NAME,
        'region': AWS_REGION,
    })

# API to generate presigned URL for direct S3 upload
@csrf_exempt
def get_presigned_url(request):
    filename = request.GET.get('filename')
    content_type = request.GET.get('type') or 'image/jpeg'  # fallback if not provided

    if not filename:
        return JsonResponse({'error': 'Filename is required'}, status=400)

    s3 = boto3.client('s3', region_name=AWS_REGION)
    key = f'uploads/{filename}'  # preserve original extension (e.g., .png, .jpg)

    try:
        url = s3.generate_presigned_url(
            ClientMethod='put_object',
            Params={
                'Bucket': BUCKET_NAME,
                'Key': key,
                'ContentType': content_type
            },
            ExpiresIn=300  # 5 minutes
        )
        return JsonResponse({'url': url, 'key': filename})
    except Exception as e:
        return JsonResponse({'error': str(e)}, status=500)
HTML Template – fileupload.html
{% extends 'core/base.html' %}
{% load static %}

{% block title %} Image Processor • Abraham Ouma {% endblock %}

{% block content %}
<div class="container" style="max-width: 600px; margin: 50px auto; padding: 20px; box-shadow: 0 10px 20px rgba(0,0,0,0.15); border-radius: 12px; background: #fff;">
  <h2 style="text-align: center; margin-bottom: 20px; font-weight: 700; color: #222;">
    Upload Image for Processing
  </h2>

  <div style="display: flex; flex-direction: column; gap: 15px;">
    <input type="file" id="fileInput" accept="image/*"
           style="padding: 10px; border: 1px solid #aaa; border-radius: 6px; font-size: 14px; color: #222;">

    <button onclick="uploadImage()"
            style="padding: 12px; background-color: #0066cc; color: #fff; border: none; border-radius: 6px; font-weight: 600; cursor: pointer;">
      Upload & Process
    </button>

    <div id="status" style="text-align: center; color: #444; font-size: 15px; font-weight: 500;"></div>
  </div>

  <hr style="margin: 30px 0;">

  <div style="text-align: center;">
    <h4 style="margin-bottom: 10px; color: #222;">Processed Image:</h4>
    <img id="result"
         style="max-width: 100%; border-radius: 8px; box-shadow: 0 4px 12px rgba(0,0,0,0.15); display: none;">
  </div>
</div>

<script>
  async function uploadImage() {
    const file = document.getElementById('fileInput').files[0];
    const status = document.getElementById('status');
    const result = document.getElementById('result');
    result.style.display = 'none';

    if (!file) {
      status.innerText = 'Please select an image.';
      return;
    }

    status.innerText = 'Generating upload link...';

    try {
      const response = await fetch(`/get-upload-url/?filename=${encodeURIComponent(file.name)}&type=${encodeURIComponent(file.type)}`);
      const { url, key } = await response.json();

      status.innerText = 'Uploading...';

      await fetch(url, {
        method: 'PUT',
        headers: {
          'Content-Type': file.type
        },
        body: file
      });

      status.innerText = 'Processing... please wait';

      setTimeout(() => {
        const processedUrl = `https://{{ bucket }}.s3.{{ region }}.amazonaws.com/processed/${file.name}`;
        result.src = processedUrl;
        result.style.display = 'block';
        status.innerText = 'Done!';
      }, 10000); // wait 10s for Lambda to process
    } catch (err) {
      console.error(err);
      status.innerText = 'Something went wrong during upload.';
    }
  }
</script>
{% endblock %}
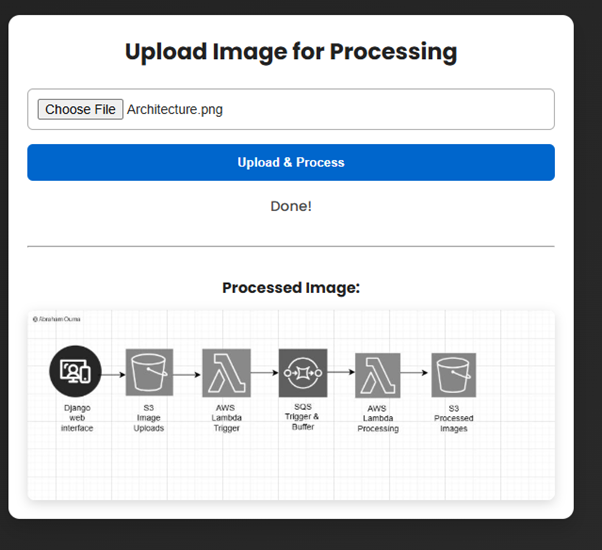
Outcome of step 5:
- A user can open /upload/, select an image, and upload it directly to S3.
- The image is queued, processed by Lambda 2, and the result is displayed from the processed/ folder.
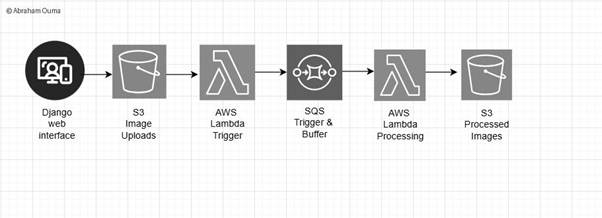
Uploaded Image: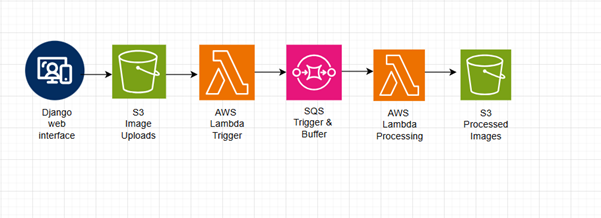
Output:
5. Challenges & Solutions
To be honest I faced several challenges during the implementation of this project because I was using it to learn how AWS services I used could be coupled together to create a complete pipeline.
Here's a breakdown of key challenges and how each was resolved.
1. AccessDenied Errors When Viewing Processed Images
Problem:
Accessing the processed/ image via its public S3 URL returned an XML error:
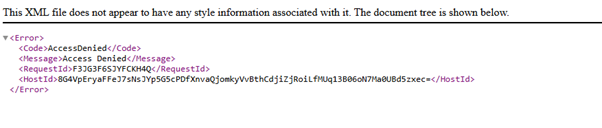
Solution:
I configured a public bucket policy to allow public access to the processed/ folder.
2. NoSuchKey: Lambda Couldn’t Find the Uploaded Image
Problem:
Lambda triggered immediately after the message hit SQS, but the image hadn't yet reached S3. This caused the following error:
An error occurred (NoSuchKey) when calling the GetObject operation
Solution:
I added a retry mechanism with a short delay (sleep between retries) inside the Lambda function to poll for the file:
for attempt in range(max_retries):
    try:
        obj = s3.get_object(Bucket=bucket, Key=key)
        break
    except s3.exceptions.NoSuchKey:
        time.sleep(delay_between_retries)
3. Upload Fails for Certain Filenames (Spaces, Brackets, Pluses)
Problem:
Files named like image (1).png or White + Orange.png caused NoSuchKey or display failures because the filename wasn't correctly encoded in S3 or during fetch.
Solution:
I ensured:
- Filenames were URL-encoded in Django when requesting presigned URLs.
- Lambda handled any characters as-is from the decoded SQS message.
- HTML fetches used the encoded filename to build the processed image URL.
6. Key Pointers & Final Tips
Before you run off to replicate or deploy this solution, here are some important insights that helped keep the project smooth and bug-free.
1. Use CloudWatch Logs Extensively
CloudWatch was invaluable for debugging both Lambda functions. It helped identify:
- When NoSuchKey errors occurred and what filenames were passed.
- Permission issues like AccessDenied or unsupported ACLs.
- Confirming message reception from SQS.
- Execution flow inside the retry loop.
Add print() statements inside your Lambda functions at every key step.
2. Ensure You Are in the Correct AWS Region
One of the initial hidden issues was caused by:
- Uploading to S3 in ap-northeast-1 but generating presigned URLs in a different region.
- This caused Lambdas to not trigger, URLs failed, and debugging was unnecessarily hard.
- Be consistent with your AWS region across all services - S3, Lambda, SQS, IAM, and your SDK clients (e.g. boto3 with region_name=).